Teachers

- Please be sure you sign up for an account on a computer and NOT a mobile device (iPad, iPhone, Android etc.).
- You MUST use a Computer to access the Teacher Platform of
RockOutLoud.Live. Mobile Devices can ONLY BE USED BY YOUR STUDENTS by installing the ROCKOUTLOUD app found in the App Store or Google Play! - The RockOutLoud.Live Platform can be used on a PC, Mac, Laptop or
Chromebook running Google Chrome. - Are you using Google Chrome?
- If you are not using Google Chrome on your PC, Mac, Laptop or Chromebook please download and install it HERE.
- The RockOutLoud.Live application will NOT work on any other browser (I.E. Safari, Edge, Firefox, Brave, etc.).

If you are a Teacher using the RockOutLoud.Live platform, you will not be able to run this application on any Mobile Devices. Due to the amount of resources you have inside the application the only way a teacher can use the RockOutLoud.Live app is by using Google Chrome on a PC, Mac, Laptop or Chromebook.
The Sign Up Process

Please be sure you sign up for an account on a computer and NOT a mobile device (iPad,
iPhone, Android etc.).
RockOutLoud.Live offers a FREE Version. Our FREE Version offers our exclusive PDF Upload technology that allows you to Upload any PDF file Located on your computer, directly into your lesson and the PDF is sent (in REAL-TIME) directly to your student on their device where they can download and print it out!
No more emailing ‘Mom or Dad’ after a lesson in hopes they print it out for their child!
To Sign up: Visit https://RockOutLoud.Live and select Plans and Pricing

Signing up for our FREE Teacher License

FREE Teacher License: Allows you to use the RockOutLoud.Live platform and use our exclusive PDF Uploader which allows you to select a PDF on your computer and it will be sent to your student in Real-Time. Your Student will be able to Download this PDF file you uploaded and save it to their computer, laptop, Chromebook or mobile device.
Limitations of the FREE Teacher License
Teachers who use the FREE Teacher License will not have their own custom URL (link used to send to your students). This means each time you want to start a Virtual Music Lesson you need to Logon to your account, enter your username and password and Create your Virtual Room.


Using the FREE Version means you will need to create a Virtual Teaching Room each time you want to teach a lesson. A ONE-TIME Teaching Room ID is randomly generated and will be used for your ONE-TIME Virtual Lesson. Once you have finished teaching in the room, your room [Teaching Room ID] cannot be reused. If you want to teach another lesson you will need to log back in to your FREE Account and Create a [NEW] Virtual Teaching Room where you will see a NEW Teaching Room ID Generated.
Signing up for a Paid Subscription

7-Day FREE Trial before you are billed. You may cancel your subscription at any time and there are NO CONTRACTS.
✅ Single Teacher License: Allows you to use the RockOutLoud.Live platform and use our exclusive PDF Uploader which allows you to select a PDF on your computer and it will be sent to your student in Real-Time. Your Student will be able to Download this PDF file you uploaded and save it to their computer, laptop, Chromebook or mobile device.
✅ You will also have a Custom URL* (Your Own Room ID) of your own Teaching Room which will last the lifetime of your membership. Once you send this Custom URL to your students you will not have to send it again unless you decide to change your Custom URL.
✅ 7-Day Free Trial with the ability to Cancel at any time.
✅ Access to our 20+Terabyte database of sheet music and tablature. All sheet music is licensed through Rock Out Loud and is available to share among your students.
✅ A Music Teachers Annotation Toolbar. Our exclusive Custom Annotations Toolbar will allow you to open a whiteboard inside your Virtual Music Lesson. You will be able to upload PDF’s into the whiteboard and annotate the PDF with our Annotation Tools. Our Custom Annotation Toolbar will allow you to pull up staves of Treble and Bass Clef, notate and compose inside the whiteboard. Tablature saves for Guitar and Bass Guitar will be available as well as Blank Chord Charts for Guitar and Ukulele.
✅ Access to our Exclusive Enhanced Audio Recognition (E.A.R.) technology which offers the lowest possible latency available on the Internet. Our E.A.R. technology.
*What is a Custom URL? A Custom URL is the link you send your students to join the Virtual Music Lesson. A Custom URL will look like this: rockoutloud.live/join/mymusicschool
Please be sure there are NO Capital Letters and NO SPACES in your Custom URL. These are LINKS that are sent to your students. The Internet will NOT recognize spaces.
❌ This will NOT work: https://rockoutloud.live/join/My Music School
✅ This is how it must look: https://rockoutloud.live/join/mymusicschool
Signing Up for a Single or Multi-Instrument Account.
Signing up for an account requires you do it on a Web Browser on a
computer, laptop or Chromebook.
You CANNOT Sign Up on a Mobile Device (iPad, iPhone or Android)

Clicking on the SIGN UP link in the MENU will bring you to the Create an account Page.
Selecting Single Teacher License will prompt you to select the Instrument you will be teaching.

Selecting Multi-Instrument License will select all of the available Instruments. This option was created for teachers who teach more than one instrument. *

*Note that all 6 rooms are selected by default. These options are included in the Multi-Instrument License and cannot be removed. If you do not need these instruments simply do not use them.
Once you’ve selected your plan, hit NEXT
Here you will enter your Credit Card Info. Credit Cards are NOT stored on our servers.


Your Credit Card will NOT be charged until the 8th Day. If you get a notification from your Credit Card Company about a charge, it is a verification that you have a valid card on file and you will not be charged until the 8th day (after your 7-Day Free Trial). You can cancel any time before the 8th day and you will not be charged.
MY ROOM (Paid Subscribers Only)
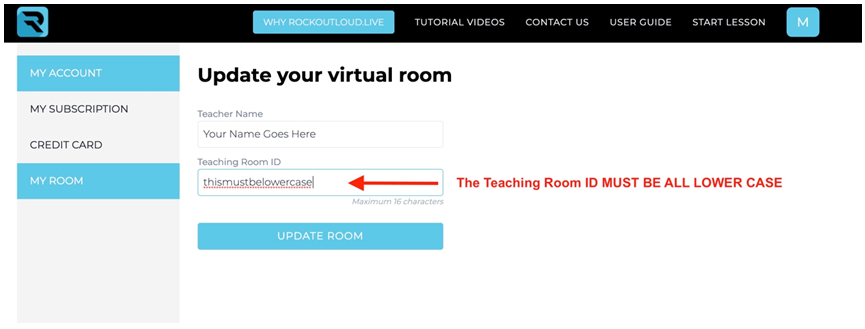
As a paid subscriber you can change your teaching room name at any time. To do so, go to MY ACCOUNT and select MY ROOM.

Please be sure your Teaching Room ID is all lowercase letters. Uppercase/Capital Letters will cause issues on mobile devices.
Navigating the Music School Portal
Rock Out Loud Live released the Music School Portal designed to help Music School Owners manage their teachers, lessons and room ID’s under one account. You will be able to modify room names, upload your own lesson plans and pay for your teacher licenses all in one place.
Please note, that you and your teachers will need to login to
https://RockOutLoud.live/school to access their account.
Getting Started
Visit RockOutLoud.live and select Plans and Pricing
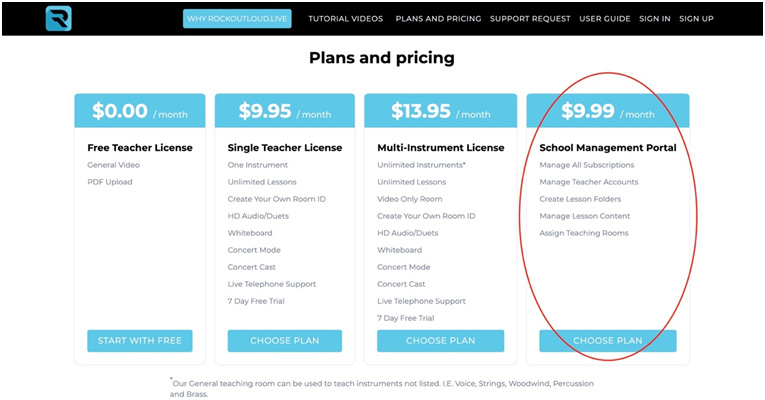
Once you have created your Music School Portal Account you will be sent to the Dashboard. Here you will add teachers to your account.
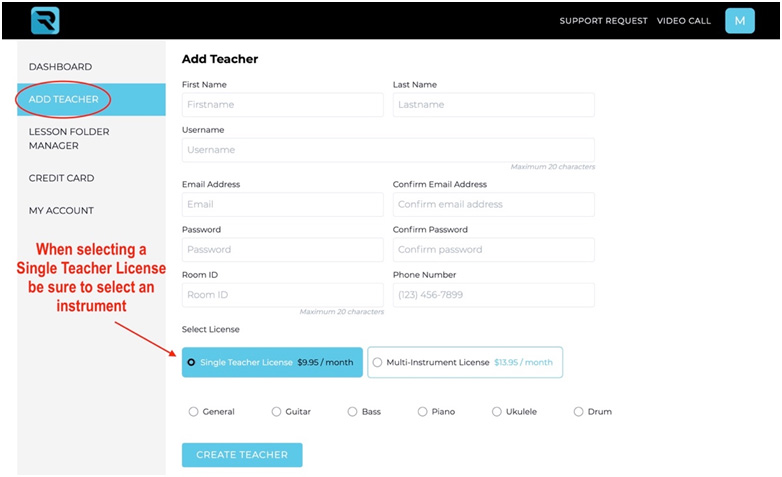
When you are creating a Teacher Account you will be creating a username. This will be the username your teacher will need to login. The Room ID will be the name of the Teaching Room.
*It is best practice to name this as a general room name; I.E. musicroom1 or pianoroom1. We discourage you from naming the room after your teachers name in the event that teacher no longer works for your school. Naming a Room ID: joespianoroom will be awkward if Joe leaves your school and the new teachers name is Sam. Sam would then be using joespianoroom to teach his new students. Make sense?
Selecting a Single or Multi-Instrument License
A Single Instrument License allows you to choose ONE room type. We have included a GENERAL Lesson Room that can be used for an instrument that is not listed; I.E. Flute, Violin, Cello etc.
A Multi Instrument License allows you access to ALL of the listed teaching rooms.
*You may upgrade to a Multi-License room at any time. You may downgrade to a Single License room at any time.
Accessing the Music School Portal as the Account Owner
As the owner of a Music School Account, you must log in to your portal by visiting:
https://RockOutLoud.live/school
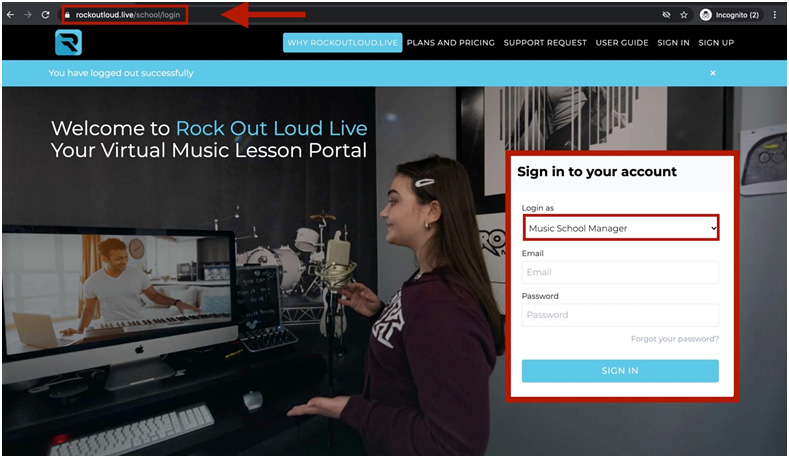
The teacher must log in with their assigned USERNAME and PASSWORD to access their account.
Assigning a Lesson Folder and Lessons to a Teachers Profile
After creating a teacher account you are brought back to the Dashboard. By Default, teachers will NOT be able to upload any lesson material into the lesson. You [the music school owner] have full control over what material you want your teachers teaching. To create a lesson folder and upload your lessons; select LESSON FOLDER MANAGER. Here you can create custom folders for you to share and assign to your teachers.
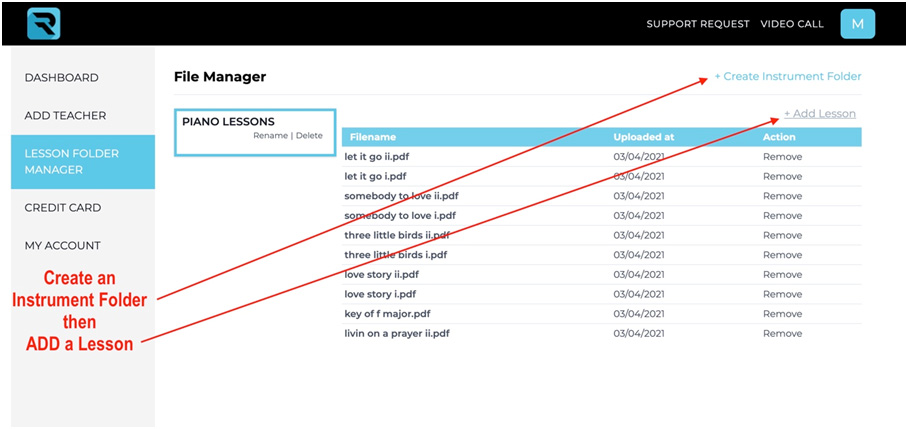
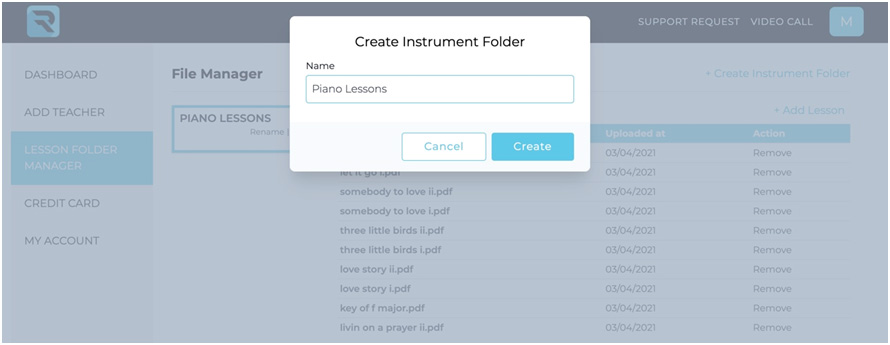
Once you’ve created an Instrument Folder you can upload your lessons directly into the folder.
***It is important to note you must add SINGLE FILE PDF files into this folder. Adding books or large files with multiple pages will not upload.
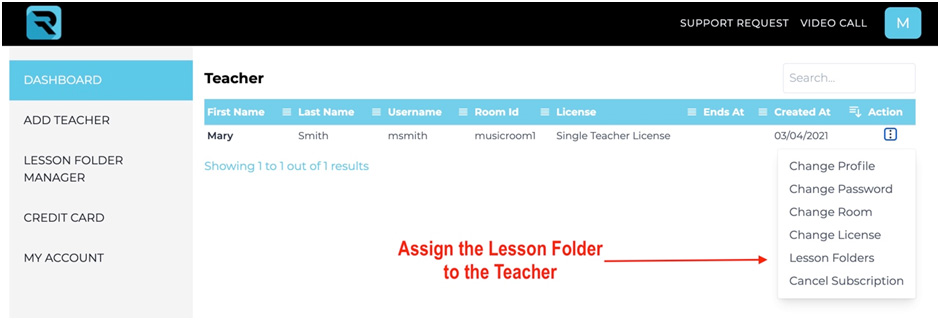
To assign a Lesson Folder to a teacher, go back to the Dashboard. Select the 3 dots [Action] area next to the teacher’s name. Select Lesson Folders. Here you can choose what folders your teachers can see when teaching a lesson.
It is important to note that the Music School Portal was made for music schools with multiple teachers. The Music School Account does not have a teacher’s license however, a music school admin may start a video call for teacher conferences and virtual meetings.
