Ways to enhance your Virtual Lesson Experience
Using headphones will enhance your Virtual Lesson experience. When taking a Virtual Music Lesson, it is important to note that while you are using your computer or mobile phone WITHOUT headphones, the speakers are projecting the sound (your voice or instrument that you are playing) out of the computer speakers and the microphone picks that up! Make sense? By wearing headphones, you have eliminated the ‘sound loop’ that is playing the music from your speakers back into your microphone.

Adding Additional USB Camera’s VS Joining the Session with an iPhone or iPad

Many teachers love having as many views possible for their students. It makes for a much better experience especially if you can have a camera on the teacher, the teacher’s hands and possibly an overhead camera for those piano teachers who’d like to show the view of the piano keyboard.
We recommend adding additional USB cameras to your computer or laptop rather than logging in to a Virtual Music Lesson as an additional ‘guest’ and joining the room with an iPhone or iPad. When logging into your session with an additional device as if you were another student, you are reducing the bandwidth of the entire session. Because additional devices that ‘join’ the session take up bandwidth, the connection between the teacher and student becomes degraded. Adding an additional USB camera to toggle between views maintains a peer to peer connection between the teacher’s computer and the student. Adding another WIFI device to show a different view reduces the bandwidth of the session and is highly discouraged.

Screen Sharing and Using an iPad
(Instructions for a Mac)
When connecting your iPad to your Mac (iMac, MacBook Air, MacBook, MacBook Pro), you must connect the iPad directly to the USB port. The Thunderbolt cable from your iPad will connect to the USB port of your Mac.
Step 1: Verify you can Screen Share using your Mac.
Go to your System Preferences ![]() on you Mac.
on you Mac.
Select Security and Privacy and scroll down to Screen Recording![]()
Select Screen Recording and be sure Google Chrome is available.
Once you select Google Chrome you will be prompted to QUIT Google Chrome. Once you QUIT Google Chrome you’re now able to Screen Share.
***If Google Chrome does NOT appear you will need to try to share your screen first BEFORE following these instructions, at which point your Mac will attempt to access Google Chrome.***

Step 2: After you’ve connected your iPad via the Thunderbolt cable to the USB on your Mac, Open QuickTime. You can access QuickTime by opening your Spotlight Search (the magnifying glass located in the top right corner of your screen, next to the clock).

Step 3: Once you Open, select File-(select) New Movie Recording.

Step 4: To the right of the Red Record Button, select the drop
down and select your iPad.
Step 5: Start your lesson on RockOutLoud.live. Once connected, select the Share Screen located in the bottom left corner of your Lesson Screen.

Step 6: Select the Application Window Tab. Select Movie Recording and hit the Share Button.


Understanding the Whiteboard
Rock Out Loud Live’s Virtual Whiteboard was designed to be used inside the Virtual Music Lesson Experience. Please follow these steps to learn how to use the Whiteboard along with all of the features available to you. Understanding the Whiteboard and all of its features will offer your students an amazing experience.
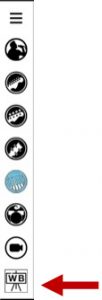
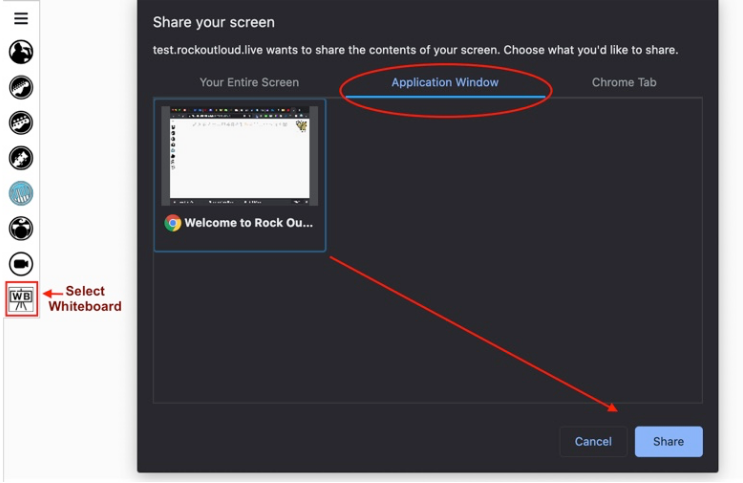
Paid Subscribers [only] will see the WB icon located on the left side navigation panel. Selecting the WB icon will open a Whiteboard and prompt you to Share Your Screen. It is important to note that Sharing your Screen will allow your students to see you annotate. If you choose NOT to share your screen your students will not see the Whiteboard.
Select the Application Window | Select the Google Chrome Rock Out Loud Live Session | Share

When Exiting your Whiteboard (by selecting ![]() in the toolbar of your Whiteboard), you will not lose any of your annotations. To CLEAR your Whiteboard, you will need to select the Trash Icon
in the toolbar of your Whiteboard), you will not lose any of your annotations. To CLEAR your Whiteboard, you will need to select the Trash Icon ![]() which will clear your Whiteboard.
which will clear your Whiteboard.
Downloading your Whiteboard
[Teachers] When you want to Save your Whiteboard, select the Download ![]() Whiteboard icon. Your Annotations will be downloaded to your computer and saved as a PDF.
Whiteboard icon. Your Annotations will be downloaded to your computer and saved as a PDF.
Uploading the Whiteboard for Your Student to Download
Once you’ve downloaded and SAVED the Whiteboard, use the Select PDF option to upload it. Your student will be able to download it directly to their PC, Laptop, Mac, Chromebook or Mobile Device.
Closing Your Whiteboard Session
When you are done annotating on your Whiteboard you must first select the Stop Sharing Button located on the bottom of your Whiteboard. Failure to Stop Sharing will result in an infinite video loop.
Hit the STOP Sharing Button | Hit the Close Window icon![]()
Using Concert Mode*
When logging in to your account you will see a tick box labeled Concert Mode.
Concert Mode will allow you to have FULL CONTROL over your Group Lessons, Concerts and Recitals.

When selecting the Concert Mode your students will all arrive muted by default. This is by design. Your students will NOT be able to unmute themselves. Unmuting can only be done by YOU, the teacher, or as I’d like to call it; the Conductor.
Concert Mode was designed for you to take FULL CONTROL of everyone who joins your room. When someone in your room is performing, it is best practice to have all other students and guests muted as any background noise from any of the other participants will distract the performer. STUDENTS WILL NOT BE ABLE TO MUTE/UNMUTE THEMSELVES.
The Teacher/Conductor must manually UNMUTE the student by following these steps:
Select the 3 dots located in the top right of the student you’d like to UNMUTE’s thumbnail.
Select UNMUTE. That student will now be unmuted.

If any of the students has a question and they are muted, we have provided the Hand Raise option. Please let your students know that if they’d like to ask a question, they will need to select the hand located at the bottom left side of their screen.

Our Confetti feature allows all students and guests to celebrate the performer. Once the confetti is selected it is sprinkled across all devices in the room.

*For our Paid Subscribers Only
Concert Cast*
Because RockOutLoud.Live is built on Google Chrome’s platform, you can ‘Cast’ your virtual lesson directly to your TV if you have a Google Chromecast Device (sold separately).
To ‘Cast’ your virtual lesson, follow these steps.

Then select the device you want to connect to.

